Car Horn Not Working? How to fix a car horn
The car horn, a crucial safety feature, serves as a means of communication and warning on the road. It is possible, however, for your car horn to stop working when you are in an unsafe situation. Fear not, fellow driver, for this guide will delve into the mysteries of a non-functioning car horn and equip you with the knowledge to restore your voice on the road.
You will be guided through the step-by-step process of troubleshooting and fixing a malfunctioning car horn by discovering the common causes.
Understanding the Components:
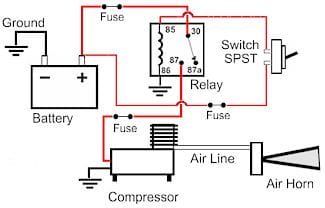
Before diving into the troubleshooting process, it’s beneficial to understand the components that make up a car horn system. An electric horn consists of several components, including the horn itself, a relay, and the wiring connecting these elements. Familiarizing yourself with these parts will aid in identifying potential issues.
This is the maestro, your finger’s conductor on the steering wheel. When pressed, it sends an electrical signal to the orchestra.
This acts as the stage manager, amplifying the weak current from the button to energize the real star of the show.
This metal diaphragm vibrates rapidly, producing the sound waves that pierce the air.
Step 1: Check the Fuse
1. Locate the Fuse Box:
The fuse for the car horn is typically housed in the vehicle’s fuse box. Refer to your vehicle’s manual to find the exact location of the fuse box.
2. Inspect the Horn Fuse:
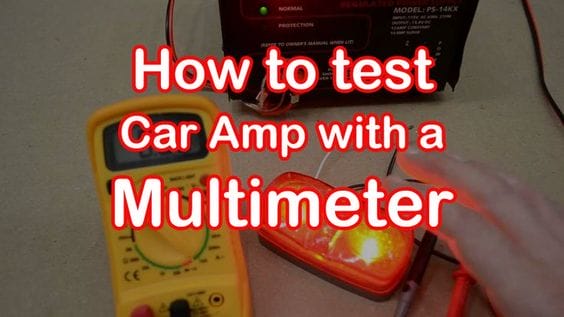
Once you’ve located the fuse box, open it and find the fuse labeled for the horn. Check if the fuse is intact by visually inspecting it or using a multimeter. If the fuse is blown, replace it with a new one of the same amperage.
Step 2: Check the Relay
1. Locate the Horn Relay:
The horn relay is usually located in the engine compartment near the fuse box. Consult your vehicle’s manual or the relay diagram on the fuse box cover to identify the horn relay.
2. Test the Relay:
Check the relay by pressing the horn button and turning the ignition on. If there is no click, it may indicate a faulty relay. Swap the horn relay with a similar one from another function (e.g., headlights) to see if the horn starts working.
Step 3: Inspect Wiring and Connections
1. Visual Inspection:
Examine the wiring connected to the horn, relay, and fuse for any visible damage, fraying, or loose connections. Pay close attention to areas where the wiring passes through the firewall or is exposed to the elements.
2. Check Ground Connections:
A poor ground connection can impede the horn’s functionality. Ensure that the horn is securely grounded to the vehicle’s chassis. Clean the connection points and tighten any loose bolts or screws.
Step 4: Test the Horn
1. Direct Power to the Horn:
If the fuse, relay, and wiring are all in good condition, you can test the horn itself. Disconnect the horn and use jumper wires to directly apply power from the battery. If the horn sounds, it indicates that the horn unit is operational.
2. Inspect the Horn Switch:
The horn switch on the steering wheel may be faulty. Disconnect the wires leading to the switch and use a multimeter to check for continuity when the horn button is pressed. If there is no continuity, the switch may need replacement.
Step 5: Check for Corrosion
1. Battery Terminals:
Corrosion on the battery terminals can affect the overall electrical system, including the horn. Clean the battery terminals using a mixture of baking soda and water and a wire brush.
2. Inspect Other Electrical Components:
Check for corrosion or rust on other electrical components in the horn circuit. Any junction in the wiring, including relay terminals, fuse contacts, and fuse contacts. Clean and secure any corroded connections.
Step 6: The Art of the Fix:
With the diagnosis complete, it’s time to roll up your sleeves and become a mechanic (at least for this repair). Remember, safety first! Disconnect the battery before working on any electrical components.
1. The Conductor’s Tune-Up:
Cleaning the horn button contacts or replacing it with a new one may be all it takes.
2. Stage Manager Shuffle:
If the relay is playing dead, consult your car’s manual to locate it and swap it out for a new one.
3. Reviving the Star:
Clean the horn’s terminals and wiring, ensuring secure connections. Your manual will list the appropriate amperage type to replace a blown fuse.
Step 7: Consult Professional Help
1. Vehicle-Specific Issues:
If the horn issue persists after performing the above steps, it might be a vehicle-specific problem requiring professional diagnosis. Consult your vehicle’s service manual or take your car to a qualified mechanic or auto electrician for further inspection.
2. Airbag Considerations:
Modern vehicles often integrate the horn switch with the airbag system. Due to the potential safety implications, you should seek professional assistance if your car has an airbag and you suspect there is a problem with the horn switch.
Bonus Tips for the Road:
- Preventative Maintenance:
Regularly check the horn’s condition and connections to avoid sudden silence.
- Honk Responsibly:
Use your horn only when necessary and avoid excessive honking, especially late at night or in residential areas.
- Know Your Local Laws:
Different regions have varying decibel restrictions for car horns. Be mindful of the regulations in your area.
The Final Note:
In most cases, troubleshooting and fixing a non-working car horn is a straightforward process if approached systematically. By checking the fuse, relay, wiring, and horn switch, and addressing corrosion issues, you can often identify and resolve the problem. If the problem persists, or if your vehicle has specific airbag issues, seeking professional assistance is the safest and most effective way to resolve it.
Remember, a car horn is more than just a noisemaker; it’s a crucial safety tool and a voice on the road. You can ensure your voice is heard by knowing how it works and taking care of it properly, keeping yourself and others safe. So, the next time the symphony of the road falls silent, you’ll be equipped to restore the harmony, one honk at a time.
Happy Honk!
FAQs:
Can you replace a car horn by yourself?
Yes, in many cases, you can replace a car horn by yourself. Replacing a car horn is generally considered a straightforward task that doesn’t require advanced mechanical skills. Here’s a general guide on how to replace a car horn:
Tools and Materials:
- New car horn
- Wrench or socket set
- Screwdriver
- Wire stripper/crimper (if needed)
- Wire connectors (if needed)
Steps to Replace a Car Horn:
- First of All, Consult your car’s manual
- Locate the Old Horn
- Disconnect the Old Horn
- Remove the Old Horn
- Install the New Horn
- Connect Wiring to the New Horn
- Test the Horn
- Secure Wiring
- Reconnect the Vehicle Battery
- Final Check
Why does my car horn sound weak?
A weak-sounding car horn can be attributed to several factors, and diagnosing the issue requires a systematic approach. Here are some common reasons why a car horn may sound weak:
- Corroded Terminals
- Faulty Horn Relay
- Bad Wiring Connections
- Weak Battery
- Worn Horn Mechanism
- Inadequate Grounding
- Faulty Horn Switch
- Debris or Obstructions
- Air Leaks
- Aftermarket Modifications
Which car horn sound is best?
There is no one “best” car horn sound, as it depends on factors such as your requirements, preferences, and local regulations. However, I can help you navigate the different options and choose the one that suits you best. Here are some things to consider:
Purpose:
- Safety
- Style
- Legality
Sound Properties:
- Volume
- Tone
- Type
Here are some popular car horn sounds and their pros and cons:
Standard Electric Horn:
- Pros: Common, affordable, and legal in most places.
- Cons: Relatively quiet, less noticeable.
Dual-Tone Horn:
- Pros: Louder, distinctive sound, better penetration.
- Cons: Might be illegal in some areas, and could be annoying if used excessively.
Musical Horn:
- Pros: Fun and personalized, adds a unique touch.
- Cons: Might not be legal everywhere, and might not be effective in emergencies.
Air Horn:
- Pros: Extremely loud, effective for attention.
- Cons: Very loud, illegal in many areas, can be startling and aggressive.
Where is the car horn located?
The location of the car horn can vary depending on the make and model of your car you can find them by following your car’s owner’s manual, but it’s typically found in one of these places:
- Under the Hood
- Behind the Front Grille
- Near the Radiator
- Behind the Front Bumper
- Inside the Wheel Well
- Inside the Cabin
- Follow the wiring harness
- Listen for the sound
How much does it cost to repair a car horn?
The cost of repairing a car horn can vary depending on several factors, Here’s a rough estimate of repair costs you might encounter:
- Simple fixes: $5-$20
- Electrical repair: $50-$200
- Horn replacement: $20-$200 (parts) + $50-$150 (installation)


